Tuesday, March 16, 2010

Make It Take It


We did a couple of really fun projects at the show in Vegas. The one that was the biggest hit was our Stamp A Bank. See them stacked in the top left hand corner of the photo. We have a "Can A Gift" that we can actually seal things in for gifting, but this time, Gary put slots in the tops for banks. When the bottom pull tab is removed to get the "loot" a plastic lid from hot chocolate, baby formula, etc. makes it a secure vessel again to fill up and save for a rainy day or something fun!

The kids really had a ball stamping these and seemed to stay forever. We didn't rush them because they were having such a great time, and hopefully we've helped create a new generation of stampers.

Sunday, March 14, 2010

"Blood", sweat, and tears went into these mounts!


Just like Gary and I years ago, our daughter LeeAnn is teaching her children to work. Both Jesse and Kacie were able to earn money by helping us get ready for the two shows we have done this year. Gary had taught Jesse to make the mounts, but yesterday, Jesse had to learn the hard way that power tools are dangerous!

He is lucky he still has his finger. Fortunately Grandpa was a high school shop teacher and knew what to do to stop the bleeding until Lee got him to the emergency room. Being in "shock" also slowed the flow of blood, but when the packing was removed, the blood pulsed out and they were fortunate to be at the hospital where they could handle the emergency. The injury went right to the bone and the artery. After stitching it up and packing it well, he was able to attend the concert he had been looking forward to that evening, but by the time he was in bed that night, the pain medication had worn off and he had a very rough night! If Lee had known, we could have built a sling (from hook and loop tape of course) and hung it above the bed to hold it up to keep it from throbbing.

My first instincts were that this was not going to work and I was sure Jesse would never want to touch the mounts again, but he has a great attitude and his mom assures me that it will not keep him down. Now Grandpa gets to finish up this batch. He had to just turn out the lights and will return to clean up the bloody equipment in a day or two!

Thanks Jesse for your great efforts!

Recuperating one week later!


What a week this has been. Really, it feels like a month since we were in Vegas. We left Utah last week in a blizzard and snow, and today it is the same. Vegas was much warmer!

In the bottom picture is the front of the booth with Lee and LeeAnn (He-Lee and She-Lee). Not only do we use hook and loop tape to attach our stamps to our mounts, but this entire booth was constructed with hook and loop tape and clear acrylic envelopes with unmounted rubber.

In the picture of the miniature doorway at the front left side of the bottom picture, it is a bit hard to see the rods holding panels of loop tape fabric. At home, I have everything hanging on loop tape, from my heavy tape gun, to baggies full of stamps as well as individual stamps that stick directly to the loop fabric. Before I figured this out, I was constantly looking for my tools. I had been coveting wonderful craft cabinets with loop tape walls, but their pricetags were above $2000. Why not make my own storage?

I had actually been making puppet theatres with spring rods to put in the doorway for children, but wasn't sure the rod would hold much weight. When LeeAnn assured me that they actually held her teenage son (who is far from small), then I knew we had a winner! Now everything I need to find, gets "hooked", from the needle threader for my sewing machine, to my glasses! My cricut cartridges are all hooked with a tiny piece of clear tape and are secure on their hanging loop tape panel. The keyboard thingies are alphabetized and hang in multiples in zip lock baggies from the panel

Monday, March 8, 2010

I am a proud mother!

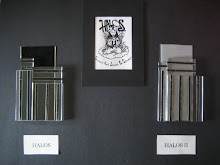
We are back from the Vegas show and I was so proud of the preparation and wonderful display LeeAnn and her supportive hubby Lee produced! When Gary and I did the shows, our booth looked nothing like this one. We were lucky just to get there.

I know that they spent hundreds of hours in preparation. Unfortunately, "while we were sleeping" (not really sleeping, but out of the scene for over 5 years) no one could find us and another system took over rubber stamping. We have a giant roll of the product that almost everyone is manufacturing their stamps on these days, but it has sat unused for 5 years. When I want to mount a stamp, I reach for my HALOS II. I don't even reach for the original HALOS, even though it would be my second choice and many customers still swear by it.

Why I love HALOS II over the other products. Cost is significant, but it's not just that. It is thinner and so much easier to cut. I can get the extra cushioning by stamping on a mouse pad. The dies are much thinner and thus easier to store.

We love hook and loop tape. It's our favorite "sticking" thing in the whole world--and how fun it has been to organize our stamps on panels of loop tape in clear envelopes! It's also how I've got many other craft supplies attached and easy to find, such as my Cricut cartridges and other accessories.

You can use HALOS mounts with ANY other system, but once people have purchased acrylic mounts without the recessed grooves, their use is limited!

No need to use just one system. Variety is the "spice of life". How much we'd miss out on if we never tried anything different. Sometimes we stick with something for years, not wanting to change. For a couple of dollars, you can get one HALOS mount that you can use on any stamp. If your stamp is too big for the mount, a little finger pressure on the areas not covered by the mount does just fine--in fact you can apply a little more direct pressure to areas that might have more detail.

We know we've got to re-establish ourself in the stamping world, so we have an offer anyone can afford. We made hundreds of cute little match boxes that contain a l" acrylic mount, and 3 mini stamps on HALOS II. We're selling them for a buck. We'll even throw in a full color idea book full of card samples for free. Because the book is so heavy, it will require $4.95 shipping, making the total only $5.95 for everything! If you like what we have, we'll even include special offers on other products. In fact, if you'd like to include a grab bag of stamp pads, glitter, embossing powder etc, just add $10. You'll get an assortment of 10 different items and it will ship with no additional postage.

More to follow including pictures! What a concept, Gary and I were too busy to even take such things during the many years we did shows, but with 4 of us at this show, we actually got to take a few pictures! Since we drove home after the show--from Vegas to SLC, Utah, we only got a few hours sleep, so this will be continued........................